Quick Answer: Before replacing the kitchen floor, inspect the subfloor for rot, mold, and level issues, then choose water-resistant flooring that can handle heavy foot traffic and daily spills. Confirm you can move appliances safely, plan dust control, and measure carefully with 5–10% extra material for cuts and future repairs. Prioritize non-slip surfaces for traction, and match durability with comfort underfoot especially if you stand and cook a lot. Finally, plan waste removal (dumpster or pickup), and decide whether cabinets stay or come out based on floor height changes and under-sink damage risk.
Start With the Reality Check (Before You Pick a Floor)
Replacing the kitchen floor goes wrong when people choose a product first and discover problems later like a weak subfloor, moisture exposure, or floors that aren’t compatible with existing cabinets and appliances.
In Asheville homes, kitchens often double as the busiest room in the house, so your new surface must handle heavy foot traffic, chairs scraping, and constant cleanup. If your overall project includes an old kitchen renovation, lock your floor decision early because it affects cabinet height, appliance clearances, and transitions to adjacent rooms.
A good floor plan starts with what the room does every day: cooking, standing, pets running, kids dropping dishes, and weekly mopping. The floor is a “performance surface” as much as a design choice.
Measure Like a Pro (And Order the Right Amount)
You should measure twice (or three times) and order extra because kitchens are rarely perfect rectangles.
For accurate planning in any floor renovation, measure the room in sections and include alcoves, doorways, and islands. When replacing a kitchen floor, most installers recommend ordering 5-10% extra for waste, pattern matching, and mistakes. This extra also helps later if you need to replace damaged pieces.
Quick Fix (Measuring Mistakes)
If your measurements don’t match from different angles, your walls may not be square, re-measure diagonals and plan for more waste.
Inspect the Subfloor First (This Is Where Projects Fail)
If the subfloor is soft, cracked, uneven, or damp, fix it before any flooring installation.
Your subfloor is the foundation for tile, vinyl, laminate, and hardwood. If you skip inspection, your new floor can squeak, separate, crack, or trap moisture leading to mold and mildew resistance issues (because mold will form beneath where you can’t see it).
Check for:
- Dark stains around the sink and dishwasher (water damage)
- Spongy spots (rot)
- High/low areas (level issues)
- Musty odor (moisture exposure)
Tip: Run a straightedge across the floor. If you see rocking or gaps, you’ll likely need leveling compound or repairs before flooring installation.
If you suspect leaks or recurring dampness, a reliable plumbing company can verify if the issue is from the sink supply, drain, dishwasher line, or fridge water line before you cover it up again.
Replace Floor Under Kitchen Sink (Most Common Hidden Damage Zone)
If the base cabinet floor or subfloor under the sink is stained, swollen, or soft, repair it before laying new flooring.
Many kitchens look fine until you pull the toe kick and find long-term drips. This area often has repeated spills and splashes, slow leaks, or a small gasket failure that becomes long-term water damage.
What to do:
- Remove everything from under the sink and dry the area.
- Inspect the cabinet bottom and subfloor with a flashlight.
- Check for damp insulation, warped wood, or mold smell.
- Repair rot, then apply appropriate sealing / sealers (where suitable).
Water-Resistant vs Waterproof Flooring (Choose for Kitchen Reality)
Kitchens should prioritize water-resistant flooring or waterproof flooring because wetness is inevitable.
Your floor will face daily moisture: sink overspray, fridge dispenser drips, pet bowls, mopping, and cooking messes. The wrong product can swell, warp, or stain.
Common options include:
- luxury vinyl tile (LVT) and vinyl plank flooring (often fully waterproof)
- laminate flooring (many are water-resistant; some are waterproof/rigid core)
- ceramic tile and porcelain tile (excellent water resistance)
- hardwood flooring (beautiful, but riskier near water without strict maintenance)
- engineered hardwood (more stable than solid wood, still moisture-sensitive)
This is where kitchen flooring materials matter more than trends.
Flooring Performance Checklist (Kitchen-Specific)
Factor | Why It Matters in Kitchens | What to Look For |
Moisture exposure | Daily wetness happens | water-resistant flooring or waterproof flooring |
Durability | Pots, pans, chairs, pets | scratch resistance, dent resistance |
Safety | Slips after spills | non-slip surfaces, slip resistance, good traction |
Light exposure | Sun can fade floors | UV-resistant coating when relevant |
Finish protection | Longer life in busy kitchens | tougher wear layer like urethane oxide finish (when applicable) |
Standing comfort | Long cooking sessions | better comfort underfoot, consider underlayment |
Non-Slip and Safety (Don’t Ignore This)
A kitchen floor should reduce slip risk when wet, especially near the sink and stove.
Look for surfaces marketed with non-slip surfaces and improved traction. Tile can be safe if you choose slip-rated textures. Many modern vinyl and laminate products also include slip-reducing textures.
Tip: If you have kids, pets, or aging family members, treat slip resistance as a must-have not a bonus.
Comfort Underfoot, Sound, and Warmth (The “Liveability” Tests)
If you stand a lot in the kitchen, your floor choice should consider fatigue, sound, and temperature.
Hard surfaces can be tiring. Vinyl and some laminates feel slightly softer. Cork is comfortable and offers sound absorption, but it’s not always ideal for high-moisture kitchens unless properly protected.
For cold tile kitchens, radiant heating can improve comfort dramatically (especially in winter). Also, the right underlayment can reduce noise and improve feel.
Choosing Kitchen Flooring That Matches Your Lifestyle (Not Just Looks)
The “best” floor is the one that fits your home’s traffic, moisture, pets, and cleaning habits.
If you’re choosing kitchen flooring for a busy household, prioritize easy cleanup, durability, and water protection first then aesthetics.
Consider:
- How often you mop
- Whether you have sharp-clawed pets
- Whether chairs scrape daily
- Whether sunlight hits the floor for hours
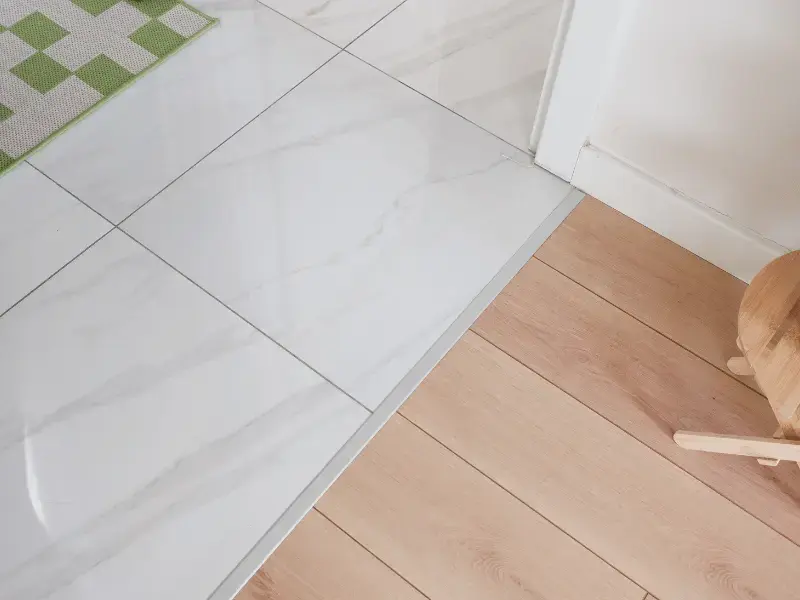
Can You Replace Kitchen Floor without Removing Cabinets
Yes, you often can but only if floor height changes won’t trap appliances or cause toe-kick/transition problems.
The key is whether you can install the new floor up to the cabinet toe kick cleanly and keep dishwashers/ranges removable. Flooring height is the #1 risk.
When It Usually Works
- You’re installing thin vinyl plank flooring or similar over an existing surface
- Cabinet bases are solid and dry
- The dishwasher can still slide out after the new floor goes in
When It’s a Bad Idea
- The subfloor under cabinets is damaged
- You need major leveling
- You’re installing thick tile that raises the floor too much
This is the practical scenario most people mean by replacing the kitchen floor without removing cabinets.
How to Replace Kitchen Floor (Prep Steps That Prevent Chaos)
The smoothest kitchen flooring project is won before demolition begins.
Here’s the order that reduces mistakes:
- Choose the flooring type and confirm installation requirements.
- Protect nearby rooms with plastic for dust control.
- Clear furniture, remove freestanding appliances if possible.
- Plan waste removal / dumpster rental or hauling.
- Start demolition / remove floors carefully (protect subfloor).
- Inspect and repair the subfloor.
- Install underlayment if required.
- Complete flooring installation and reinstall appliances.
Quick Fix: If dust is spreading, zip plastic doorways and create a “runway” with drop cloths to the exit path.
Disposal and Cleanup Planning (The Step Most People Forget)
Flooring debris adds up fast, so plan removal before you start ripping anything out.
Some local trash services won’t take certain materials automatically. You may need waste removal / dumpster rental, or a scheduled pickup. This is especially important if you’re pulling up tile or thick layers, because debris gets heavy quickly.
Material Options Explained (Pros, Cons, and Best Uses)
Most kitchens choose between tile, vinyl, laminate, or wood each with different tradeoffs.
Popular options include:
- porcelain tile: durable, water-friendly, can be hard/cold
- ceramic tile: similar benefits, many style choices
- hardwood flooring: warm and classic, but vulnerable to water
- engineered hardwood: more stable than solid wood, still needs care
- laminate flooring: budget-friendly, many water-resistant upgrades
- luxury vinyl tile (LVT) and vinyl plank flooring: durable, often waterproof
- bamboo flooring: hard, eco-friendly, moisture limits vary
- cork flooring: comfortable, needs moisture protection
- concrete flooring: durable, can be sealed, design flexibility
This is the heart of kitchen flooring research and where you align the floor to your real-world needs.
Best Flooring by Real Kitchen Problem
Your Main Problem | Best-Fit Options | Why |
Frequent spills + kids/pets | vinyl plank flooring, luxury vinyl tile (LVT) | Often waterproof flooring, high durability |
Want max water protection | porcelain tile, ceramic tile | Excellent against moisture exposure |
Want warm, classic look | engineered hardwood, hardwood flooring | Great aesthetics; manage water carefully |
Need budget + durability | laminate flooring | Strong performance for cost |
Need softer feel | vinyl, cork (with caution) | Better comfort underfoot, less fatigue |
Sunlight fading issue | floors with UV-resistant coating | Helps preserve color over time |
Budget and Planning Facts (So You Don’t Overspend)
A common planning benchmark is to allocate around 7% of a kitchen remodeling budget to flooring as a starting point (then adjust based on material and prep needs). If you’re coordinating with affordable kitchen remodeling experts, ask them to price flooring as a complete system: removal + subfloor repair + underlayment + install + transitions.
Tip: The cheapest floor can become expensive if it needs constant repairs or fails early due to moisture.
Final Pre-Reno Checklist (Fast, Practical, No Regrets)
If these checks pass, you’re ready to buy materials and schedule installation.
- Subfloor is solid, dry, and level
- Moisture sources are fixed (sink/dishwasher/fridge lines)
- You’ve decided on cabinets-in vs cabinets-out strategy
- You planned disposal and dust control
- You measured accurately and ordered extra
- You selected for water, durability, and safety first
Need Help With Leaks or Under-Sink Damage Before Flooring?
If you’re replacing the kitchen floor and want to avoid hidden moisture ruining your new install, Sudo Plumbing, LLC can help check for leaks around sinks, dishwashers, and supply lines before you cover the subfloor again.
Call Sudo Plumbing, LLC: (828) 676-8772
FAQs About Replacing Kitchen Floor
What is the most important thing to check before replacing the kitchen floor?
The most important check is the subfloor condition rot, moisture exposure, and level issues will cause early failure even with premium flooring.
Is waterproof flooring always better than water-resistant in a kitchen?
Often yes for busy kitchens, but the best choice depends on durability, slip resistance, and how the product handles wear, not just water.
Can I install new flooring over old flooring in a kitchen?
Sometimes especially with some vinyl or floating systems but only if the existing floor is flat, stable, and doesn’t trap moisture or raise height too much.
How much extra flooring should I order?
A common rule is 5–10% extra for cuts and future repairs; complex layouts may need more.
What’s the biggest mistake people make with kitchen floors?
Choosing a material for looks alone and skipping subfloor prep, moisture checks, and safety factors like traction and non-slip surfaces.
Should I fix plumbing issues before replacing the kitchen floor?
Yes any leak risk should be handled first because hidden moisture leads to mold, mildew, and subfloor damage.